Resourceful Tips for Seasonal Maintenace

Fall leaves are gorgeous in their jewel-toned colors, but as they sit on the ground during winter, they turn brown and can cause damage if they pile up next to your home. Here are some things you can do with your fall leaves from HGTV.
Raking Tips
Most people pick up leaves by raking or blowing them into piles. If you choose to rake, HGTV recommends an ergonomic rake that’s lightweight and designed to be easy on your back. Choose a wide rakehead for open lawn and use smaller rakes in your flower beds. Don’t rake wet and matted leaves. Try to give leaves time to dry or use a blower on wet leaves, and try not to walk on frozen grass because it can damage your lawn.
Chop Them Up
Fallen leaves make great compost. You can compost them in place with a mower that composts. You can collect the chopped leaves in a bag to add to a compost pile or bin, or you can compost them in place on your lawn. Leaf compost helps with aeration, moisture retention and disease fighting. Another organic compound you can make that’s garden friendly is leaf mold. Leaf mold is what makes the forest floor so spongy. It can hold 300 to 500% of its own weight in water, making it a great, moisture-holding mulch. To make leaf mold, chop the leaves as if for compost and then stuff them into a bin or black garbage bags. Pack the leaves down as you fill and wet the leaves when it’s full. Seal the bag or bin and poke holes to provide airflow, then stack them up out of the way. Flip the bags in six months and check back in a year or so for bags of fresh leaf mold. It should look like small, brown flaky bits.
Let Leaves Offer Shelter
Leaves provide a great winter home for beneficial insects and pollinators. Let leaves collect beneath shrubs and in planting beds until the coldest part of winter is over. Once warmer weather starts, the overwintering bugs will leave and you can pick up the leaves and make compost or leaf mold. Or you can leave them in place. If you leave them whole, cover them with straw or shredded bark mulch to keep them from blowing away and littering your yard. Use a digging fork or tiller to break up leaves in the spring.
Tip 2: Winterizing Your Home
Colder months mean getting your home ready to weather Old Man Winter’s chill. Winterizing your home can save you money on energy bills and can help mitigate some of the wear and tear winter weather brings.
Outside
Prepare the outside of your home by cleaning out the gutters. Move the downspouts so that they point away from your home’s foundation. These actions make sure that water from melting snow and ice or excess winter rains drains away from your home and doesn’t damage the roof or the foundation. You should also look at your trees and shrubs and cut away tree branches that hang over your house. Snow and ice buildup can cause them to snap and fall on your home. This is also the time of year to store your outdoor furniture for the winter and, before the first cold day, put a fresh coat of sealant on any decks. Disconnect garden hoses and sprinklers and store them away from the winter.
Windows and Doors
Check for drafts around your windows and doors and make sure the weatherstripping is secure. Self-sticking weatherstripping can help keep your house cozy during winter’s chill. You should also check any caulking and make repairs to broken or loose panes. You may need to set up draft guards on exterior doors.
Prepare Your Plumbing
Check your water lines, especially those that are exposed to wintry temperatures. Wrap any exposed lines in insulation and heat tape that’s plugged in and working. Close any crawl space vents that allow air to circulate to protect pipes from freezing temperatures. When the temperatures drop below freezing, leave your faucets trickling indoors and open under-sink cabinets to let the warm house air circulate around the pipes.
Catch Up On Your Climate Control
Before the cooler temperatures arrive, have your home’s heating checked by a professional. Let them make any adjustments and do any preventative maintenance so that you stay warm and cozy all winter. If you have a fireplace, make sure your chimney is in working order and that your fireplace is cleaned and ready to go for the cozy season. While you’re at it, consider setting up a programmable thermostat that reduces the heat when you’re gone and warms it up when you get back. These things can save you big on your energy bill. The professional can install it while they’re there to check the furnace. Switch the direction on your ceiling fans to counter-clockwise to redirect warm air down instead of circulating cool air throughout the room.
Tip 3: Furnace Maintenance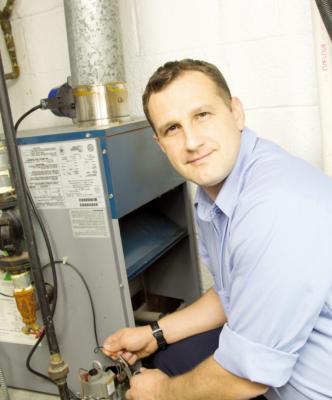 Keeping
your furnace in good repair won’t just keep your family cozy all
winter, it can also reduce your energy bills by ensuring the furnace is
running as efficiently as it can. Winter weather can be bad enough
without your furnace going out, so take the time to complete some basic
maintenance before winter’s chill sets in.
Keeping
your furnace in good repair won’t just keep your family cozy all
winter, it can also reduce your energy bills by ensuring the furnace is
running as efficiently as it can. Winter weather can be bad enough
without your furnace going out, so take the time to complete some basic
maintenance before winter’s chill sets in.
1. Turn off the power. The first step is to cut the power to your furnace. Never work on the unit while power’s still running to it. Remove the combustion chamber door by lifting it up and pulling it out, then remove the burner cover that’s usually held in place by two screws.
2. Turn on the burners. Then, you can turn the furnace back on and activate the burners. The flames should be even and blue. If the flames are yellow, that means your burners are dirty. Don’t adjust them yourself; it’s time for a professional visit.
3. Clean. If your flames are blue, turn the power back off and shut off the gas to your furnace by giving the valve a quarter turn. Once you’re sure both the power and the gas are off, vacuum the furnace burners and base. To get to the very back, tape a length of drain line to your vacuum hose. Vacuum wherever you see dust and look for signs of soot, which can be an indicator of poor combustion. Lift the lower blower door and also vacuum out the blower compartment.
4. Remove the blower. If you have a control panel in front of the blower, take out the screws to loosen it and let it hang. Remove the two bolts that hold the blower in place and gently lift it out. Vacuum and brush the blower blades using a small, stiff brush and your vacuum cleaner. Be careful
not to bend or break the wiring or disturb the counterweights on the fan blades. If you can’t clean it thoroughly, leave it for the pros so you don’t throw it off balance.
5. Change your furnace filter. This should be done at least every three months. Highefficiency filters can damage some systems, so read your owner’s manual or ask a professional before installing one of those. Blow the dust off the pilot light and clean the flame sensor with a fine sandpaper. If your furnace has a hot surface igniter, clean the dust off by blowing air on it. Be careful; this part breaks easily.
5. Give the drive belt on the blower a look for cracks or frayed areas. If you have to replace the belt, tension it so it deflects 1/2 to 3/4 inch. If you have mother bearings and blower shaft bearings, oil them with lightweight machine oil by dripping two or three drops into the oil hole on the motor.
6. Check your air ducts with sealing tape or high-temperature silicone. You should also conduct a back drafting test by adjusting the thermostat so that the burners come on and holding a candle or incense stick beside the draft hood. The smoke should be drawn in. Inspect the vent pipes on your furnace and water heater for white, powdery corrosion. If any of these areas present a problem, call a pro.
Tip 4: How to Wrap Your Pipes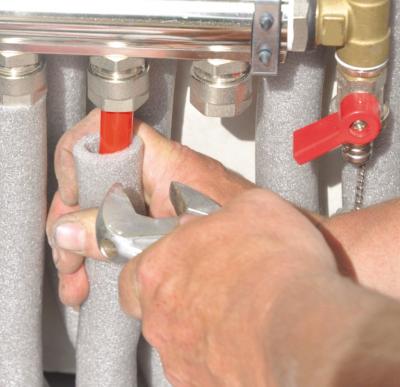
Most of the plumbing in your home is protected in heated spaces, but all homes have pipes that come out somewhere, and those pipes are particularly vulnerable to freezing temperatures. Once the ice builds up in an outdoor pipe, depending on how cold the temperatures are, it can expand and cause a leak or even a burst pipe.
You can prevent this type of plumbing emergency by wrapping your pipes before the temperatures drop. Here’s how, from the Home Depot.
You should insulate vulnerable pipes with sheets of pipe insulation or by wrapping them in heat tape or heat cables. Pipes are most vulnerable where they leave the house outdoors, or in unheated spaces such as your attic or in a crawl space. Always install pipe insulation according to the manufacturer’s instructions.
You also want to check these unheated spaces for cold air intrusion and seal up or caulk cracks that let in cold air. Make sure outdoor cut-off valves are closed and the faucets drained before cold weather hits. Store hoses and sprayers inside or under cover. You can also use faucet covers to protect the plumbing during colder weather.
Once the cold weather shows up, run a thin drip of hot and cold water through your faucets to keep water moving through your plumbing. You can also open up any under-sink cabinets to let warm air circulate around the pipes.
When You Have a Frozen Pipe
Most people discover a frozen pipe when they try to turn on a faucet and only a trickle comes out. If you find a frozen pipe, go ahead and open that faucet full bore. The flowing water, even a little bit, can help thaw the ice.
For exposed pipes, wrap the pipe in a heating pad or aim a hair dryer at it. With the dryer, keep the air moving back and forth around the pipe in 12- to 16-inch sections at a time. You can also wrap the pipe in heated, damp towels and change them frequently as they lose heat to the pipe.
For an enclosed pipe, try turning up the heat in your home to help thaw out pipes in side the walls. If you need to, cut a section of the wall to expose the pipe, use the above methods.
Never use an open flame or extreme heat, such as a blow torch, to thaw a pipe. This is a fire hazard and can cause serious damage.
 Tip 5: Managing Snow and Ice
 When the weather outside gets frightful, you start imagining the worst happening to your home.
Roof leaks, snapped gutters and high energy bills go dancing through your head. But there’s some things you can do to mitigate the effects of snow and ice on your home.
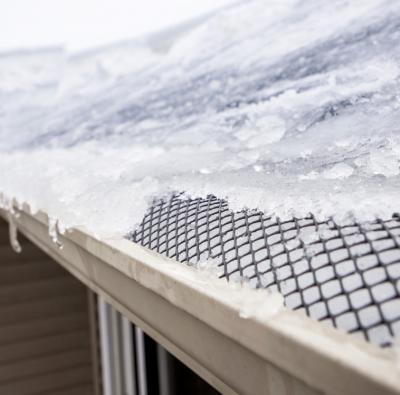
Ice Dams
An ice dam is a build up of ice on the eaves of sloped roofs that results from melting snow reaching the eave and freezing there, keeping more melting snow from draining from the roof. It causes water to back up and seep into the roof, eventually leaking into the home. It also increases the snow load on your roof because the snow and water can’t drain.
If you spot an ice dam on your home, you need to remove it immediately, but you also need to remove the root cause.
Ice dams form when heat loss occurs from a heated building, like your home, melting snow and ice which then refreezes at the eaves of the roof. Make sure your ceilings are airtight so that no warm, moist air can flow from the house to the attic. Increase the ceiling or roof insulation to cut down on heat loss.
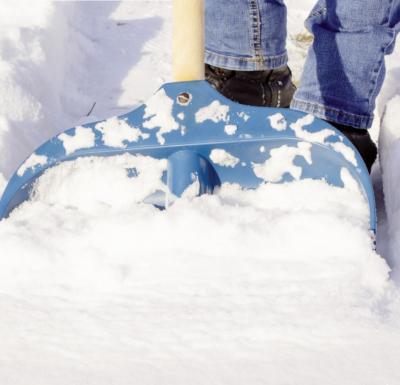
Keep Paths Clear
The paths to your home, including walkways and driveways, should be kept free of snow and ice through regular shoveling or snow blowing. Make sure any ice melt or sand you use is safe for plants and pets. Before the snow falls, flag the edges of your driveway and sidewalk so that you know where to stop shoveling. You can also hire a service to clear the snow while you’re away traveling or if you spend the winter months in a warmer climate. Remember that some cities may cite you for not keeping the sidewalk in front of your home passable.
What to do if a Pipe Freezes
Below-freezing temperatures are prime money-making time for plumbers, especially in areas where such events are rare. If a pipe freezes in your home, turn on the tap and leave it on while thawing it out. Allow warm air to flow to the affected area and make sure you use any heating devices safely. If you’ve found one frozen pipe, check the rest of the taps. It’s likely you have more. If you cannot access the frozen pipe, call a plumber.
